When you’re getting ready to list your home, it’s of the utmost importance to ensure you are showing it in the best light. Taking time to highlight its strengths and fix up some of its possible weaknesses can make a big difference in how fast it sells. Here are our top five recommended repairs to make before selling your home.
Repaint walls. Giving your home a fresh coat of paint is one of the most cost-effective ways to spruce it up, and generally, it can be a do-it-yourself project. Make sure cover any walls with scratches and chips and consider updating any accent walls with a more neutral coat.
Repair floors. Hardwood floors are a very desirable feature in a home, so you want to ensure they look their best by fixing scratches or dull areas. If your carpet is worn or stained, consider replacing them. And don’t forget the tile in your kitchen or bathrooms. Re-grouting can go a long way in making dingy tile work look brand new!
Refresh the landscaping. Show buyers your home is the full package by dressing up the outside as well as the in. Clean walkways and driveways, plant seasonal flowers and plants, trim hedges and trees, install outdoor décor pieces and fill in mulch and gravel.
Fix your fixtures. Leaky faucet? Rusted drains? Loose drawer handle? Making these small fixes can make a big difference to potential buyers with detailed-orientated minds.
Improve your kitchen. An outdated kitchen can be a real eyesore in a home. Updating cabinetry, repairing or replacing countertops, and installing new faucets and sinks may be worth the investment.
Purchasing a home is arguably one of the biggest financial decisions you will make in your lifetime. As you start your hunt, don’t forget there will be other costs associated with your purchase then the price of the home. Here are 5 fees to keep in mind as you begin to budget.
Home inspection. This is a crucial step in the home buying process. The findings that come from the inspection can help you negotiate price and repairs. Generally, you can expect to pay between $300 to $500 depending on the home and the location.
Title services. Title services encompass the transfer of the title from the seller and a thorough search of the property’s records to ensure to no one will pop up with a claim to the property. Additionally, you may need to buy title insurance which will protect the lender or your investment in the home.
Appraisal fee. Before getting a loan, you will likely be required to get an appraisal of the home to determine its estimated value. This will be conducted by a third-party company and the cost can land anywhere between $300 and $1,000, depending on the size of the home.
HOA fees. Many communities have a homeowners’ association that enforces monthly fees. This money is used for general maintenance and updates to areas like pools, parks, and more. Typical HOA fees are around $200 per month.
Taxes. The taxes each buyer pays at the closing table differ, but it is not uncommon for it to be up to two months’ worth of county and city property taxes. Additionally, there may be taxes for the transfer of the home title.
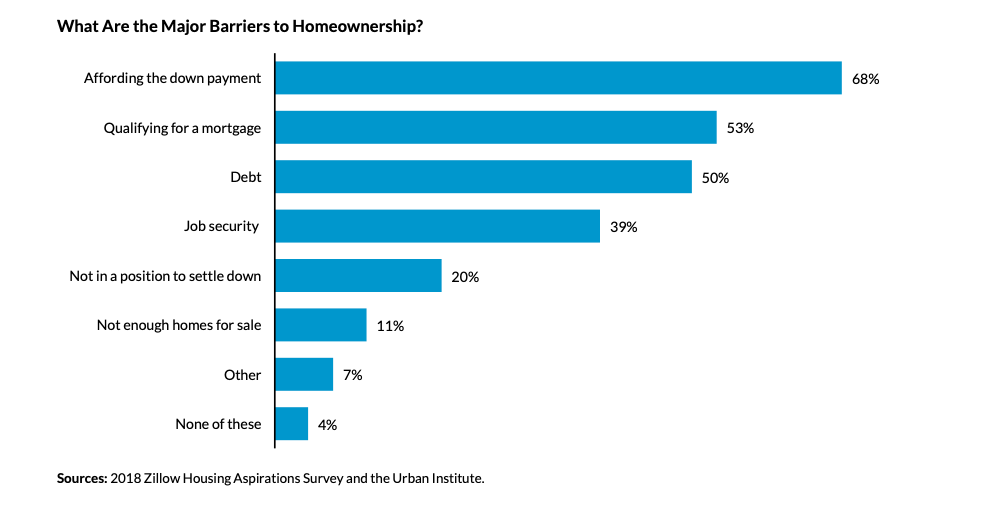
Urban Institute recently released a report entitled, “Barriers to Accessing Homeownership: Down Payment, Credit, and Affordability,” which revealed that,
Consumer Perceptions of Barriers to Homeownership Renters see the inability to save for a down payment as one of the leading obstacles to homeownership. More than two-thirds of renters surveyed indicated that affording the down payment was a barrier to becoming a homeowner.
Corroborating this, the bottom figure shows that 36 percent of consumers find it very difficult to save for a down payment, and another 30 percent find it somewhat difficult. Only 16 percent of renters said that it was not at all difficult to save for a down payment.
But there are downpayment assisstance programs available and you can contact a REALTOR at http://www.southwestcasas.com
Urban Institute recently released a report entitled, “Barriers to Accessing Homeownership: Down Payment, Credit, and Affordability,” which revealed that,
“Consumers often think they need to put more money down to purchase a home than is actually required. In a 2017 survey, 68% of renters cited saving for a down payment as an obstacle to homeownership. Thirty-nine percent of renters believe that more than 20% is needed for a down payment and many renters are unaware of low–down payment programs.”
Myth #1: “I Need a 20% Down Payment”
Buyers often overestimate the down payment funds needed to qualify for a home loan. According to the same report:
“Most potential homebuyers are largely unaware that there are low-down payment and no-downpayment assistance programs available at the local, state, and federal levels to help eligible borrowers secure an affordable down payment.”
These numbers do not differ much between non-owners and homeowners. For example, “30% of homeowners and 39% of renters believe that you need more than 20 percent for a down payment.”
While many believe that they need at least 20% down to buy their dream homes, they do not realize that there are programs available which allow them to put down as little as 3%. Many renters may actually be able to enter the housing market sooner than they ever imagined with programs that have emerged allowing less cash out of pocket.
Myth #2: “I Need a 780 FICO® Score or Higher to Buy”
Similar to the down payment myth, many either don’t know or are misinformed about what FICO® score is necessary to qualify.
Many Americans believe a ‘good’ credit score is 780 or higher.
To help debunk this myth, let’s take a look at Ellie Mae’s latest Origination Insight Report, which focuses on recently closed (approved) loans.
As you can see in the chart above, 51.7% of approved mortgages had a credit score of 600-749.
Bottom Line
Whether buying your first home or moving up to your dream home, knowing your options will make the mortgage process easier. Your dream home may already be within your reach.
You’ve most likely heard the rule: Save for a 20-percent down payment before you buy a home. The logic behind saving 20 percent is solid, as it shows that you have the financial discipline and stability to save for a long-term goal. It also helps you get favorable rates from lenders.
But there can actually be financial benefits to putting down a small down payment—as low as three percent—rather than parting with so much cash up front, even if you have the money available.
The downsides of a small down payment are pretty well known. You’ll have to pay Private Mortgage Insurance for years, and the lower your down payment, the more you’ll pay. You’ll also be offered a lesser loan amount than borrowers who have a 20-percent down payment, which will eliminate some homes from your search.
THE UPSIDE
The national average for home appreciation is about five percent. The appreciation is independent of your home payment, so whether you put down 20 percent or three percent, the increase in equity is the same. If you’re looking at your home as an investment, putting down a smaller amount can lead to a higher return on investment, while also leaving more of your savings free for home repairs, upgrades, or other investment opportunities.
THE HAPPY MEDIUM
Of course, your home payment options aren’t binary. Most borrowers can find some common ground between the security of a traditional 20 percent and an investment-focused, small down payment. Your trusted real estate professional can provide some answers as you explore your financing options.
As unfortunate as it can be when homeowners fall behind on mortgage payments and must face the possibility of losing their homes, short sales and foreclosures provide them options for moving on financially. The terms are often used interchangeably, but they’re actually quite different, with varying timelines and financial impact on the homeowner. Here’s a brief overview.
A short sale comes into play when a homeowner needs to sell their home but the home is worth less than the remaining balance that they owe. The lender can allow the homeowner to sell the home for less than the amount owed, freeing the homeowner from the financial predicament.
On the buyer side, short sales typically take three to four months to complete and many of the closing and repair costs are shifted from the seller to the lender.
On the other hand, a foreclosure occurs when a homeowner can no longer make payments on their home so the bank begins the process of repossessing it. A foreclosure usually moves much faster than a short sale and is more financially damaging to the homeowner.
After foreclosure, the bank can sell the home in a foreclosure auction. For buyers, foreclosures are riskier than short sales, because homes are often bought sight unseen, with no inspection or warranty.
Student: An FSA ID is a username and password you need to sign the FAFSA form online. If you don’t have an FSA ID, get an FSA ID here ASAP. It takes about 10 minutes to create an FSA ID. If this will be your first time filling out the FAFSA form, you’ll be able to use your FSA ID right away to sign and submit your FAFSA form online. If this is not your first time filling out the FAFSA form, you may need to wait one to three days for us to verify your info before you can use your FSA ID to renew your FAFSA form and sign it online.
Some of the most common FAFSA errors occur when the student and parent mix up their FSA IDs. If you don’t want your financial aid to be delayed, it’s extremely important that each parent and each student create his or her own FSA ID and that they do not share it with ANYONE, not even with each other.
The 2019–20 FAFSA form is available starting October 1! Even if your state and school deadlines aren’t for a while, you should complete the FAFSA form as soon as possible because some states and schools run out of financial aid early and have limited funds. Don’t wait until the last minute to apply!
If you are the student: Click “I am the student.” Enter your FSA ID username and password, and click “Next.”
If you are the parent: Click “I am a parent, preparer, or student from a Freely Associated State.” Provide the student’s name, Social Security number, and date of birth, and click “Next.”
Choose which FAFSA form you’d like to complete:
2019–20 FAFSA form if you will be attending college between July 1, 2019, and June 30, 2020.
2018–19 FAFSAform if you will be attending college between July 1, 2018, and June 30, 2019.
Both: If you will be attending college during both time periods and haven’t completed your 2018–19 FAFSA form yet, complete that first, wait one to three days until it processes , then go back in and complete the 2019–20 FAFSA form.
TIP: If you are given the option to complete a “renewal” FAFSA form, choose that option. When you choose to renew your FAFSA form, your demographic information from the previous year will roll over into your new application, saving you some time.
Remember, the FAFSA form is not a one-time thing. You must complete a FAFSA form for each school year.
Create a save key
Unlike the FSA ID, the save key is meant to be shared. A save key is a temporary password that allows you and your parent(s) to “pass” the FAFSA form back and forth. It also allows you to save the FAFSA form and return to it later. This is especially helpful if you and your parent are not in the same place.
This is information such as your name, date of birth, etc. If you have completed the FAFSA form in the past or if you log into the FAFSA form with your FSA ID, a lot of your personal information will be prepopulated to save you time. Make sure you enter your personal information exactly as it appears on your Social Security card. (That’s right, no nicknames.)
Parents:
Remember that the FAFSA form is the student’s application, not yours. When the FAFSA form says “you” or “your,” it’s referring to the student (unless otherwise noted). Pay attention to whether you’re being asked for student or parent information.
4. List the schools to which you want your FAFSA® information sent
In the School Selection section, add every school you’re considering, even if you haven’t applied or been accepted yet. It doesn’t hurt your application to add more schools; colleges can’t see the other schools you’ve added. In fact, you don’t even have to remove schools if you later decide not to apply or attend. If you don’t end up applying or getting accepted to a school, the school can just disregard your FAFSA form. But, you can remove schools at any time to make room for new schools. You can add up to 10 schools at a time. If you’re applying to more than 10 schools, here’s what you should do.
5. Answer the dependency status questions
In the dependency status section, you’ll be asked a series of specific questions to determine whether you are required to provide parent information on the FAFSA form.
The dependency guidelines are set by Congress and are different from those used by the Internal Revenue Service (IRS). Even if you live on your own, support yourself, and file taxes on your own, you may still be considered a dependent student for federal student aid purposes. If you are determined to be a dependent student, you’ll be required to report information about your parent(s). If you’re determined to be an independent student, you won’t have to provide parent information and you can skip the next step.
6. Fill out the Parent Demographics section
This is where your parent(s) will provide basic demographic information. Remember that it doesn’t matter if you don’t live with your parent(s); you still must report information about them if you were determined to be a dependent student in the step above.
Start by figuring out who counts as your parent on the FAFSA form.
7. Supply your financial information
Here is where you and your parent(s) (if applicable) will provide your financial information. This step is incredibly simple if you use the IRS Data Retrieval Tool (DRT). The IRS DRT allows you to import your IRS tax information into the FAFSA form with just a few clicks. Using this tool also may reduce the amount of paperwork you need to provide to your school. So if you’re eligible, use it!
To access the tool, indicate that you’ve “already completed” taxes on the student or parent finances page. If you’re eligible, you’ll see a “LINK TO IRS” button. Choose that option and follow the prompts.
8. Sign and submit your FAFSA form
You’re not finished with the FAFSA form until you (and your parent, if you’re a dependent student) sign it. The quickest and easiest way to sign your FAFSA form is online with your FSA ID.
Note: If you (the student) logged in to the FAFSA form with your FSA ID at the beginning, you won’t need to provide it again on this page. But, if you’re a dependent student, your parent will still need to sign before you can completely submit.
Sign and Submit Tips:
If you or your parent forgot your FSA ID username or password, you can retrieve it.Make sure you and your parent don’t mix up your FSA IDs. This is one of the most common errors we see, and why it’s extremely important for each person to create his or her own FSA ID and not share it with anyone.
Make sure the parent who is using his or her FSA ID to sign the FAFSA form chooses the right parent number from the drop-down menu. If your parent doesn’t remember whether he or she was listed as Parent 1 or Parent 2, he or she can go back to the parent demographics section to check.
If you have siblings, your parent can use the same FSA ID to sign FAFSA forms for all of his or her children. Your parent can also transfer his or her information into your sibling’s application by choosing the option provided on the FAFSA confirmation page.
We recommend signing the FAFSA form with an FSA ID because it’s the fastest way to get your FAFSA form processed. However, if you and/or your parent are unable to sign the FAFSA form electronically with an FSA ID, you can mail in a signature page. From the sign and submit page, select “Other options to sign and submit” and then choose “Print A Signature Page.” Just keep in mind that your FAFSA form will take longer to process if you go this route.
• Perform important activities such as choosing a repayment plan or applying for a deferment on your federal student loan.
Do parents need FSA IDs?
If you’re a dependent student, then your parent will need an FSA ID in order to sign your Free Application for Federal Student Aid (FAFSA®) form electronically.
Not sure if you’re considered a dependent student for FAFSA purposes? Go to StudentAid.gov/dependency to find out.
IMPORTANT
You and your parent must have different FSA IDs.
You must create your own FSA ID—it’s your electronic signature and you need to own it.
Your parent must create his or her own FSA ID.
You and your parent should each use your own email address and mobile phone number when creating an FSA ID (you can’t use/share the same email address and mobile phone number).
How do you create your FSA ID?
Go to StudentAid.gov/fsaid.
Click the “Create Your FSA ID Now” button.
Create Your FSA ID (Username and Password)
Email: Optional but strongly recommended
Each FSA ID must have a unique email address (you and your parent cannot use the same email address).
You must have access to this email account.
Username: Don’t include personal info such as date of birth or name.
If you see a message “Username taken, create a different username,” then someone has already used that username.
Provide Personal Identification
Information
Make sure your Social Security number, date of birth, and name match what’s on your Social Security card.
You must have a Social Security number to create an FSA ID.
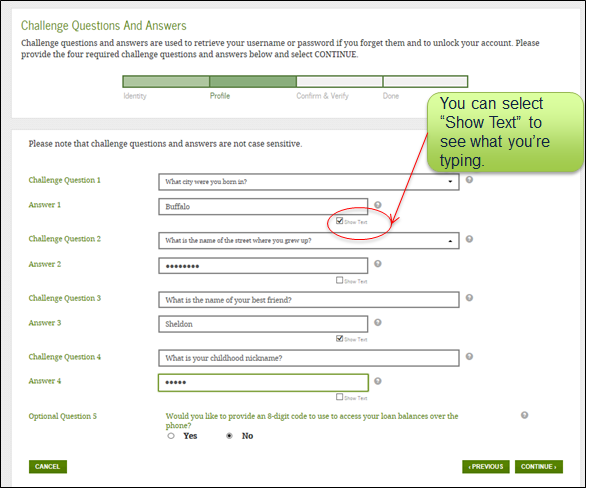
Select/Create Challenge Questions and Answers
Answering your challenge questions is one way to unlock your account or reset your username and password.
Questions 1 and 2:
Select a question from the drop-down menu and then enter your answer.
Questions 3 and 4:
Make up your own question and enter your answer.
Make sure the answers will be easy to remember.
Examples of questions:
What city was I born in?
Who was my first boss?
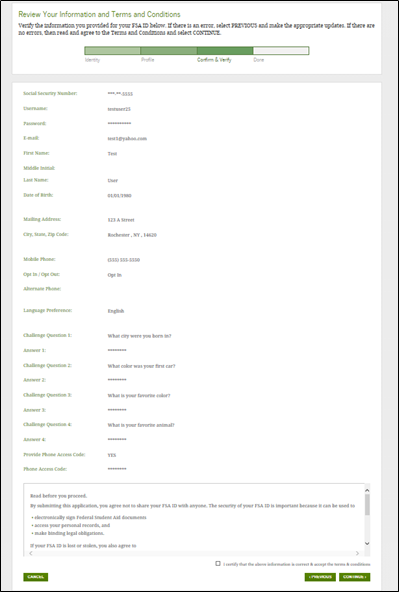
Review Info and Agree to Terms
Review and confirm your information.
If you need to make a correction, use the “Previous” button.
Review and agree to the terms and conditions for using your FSA ID.
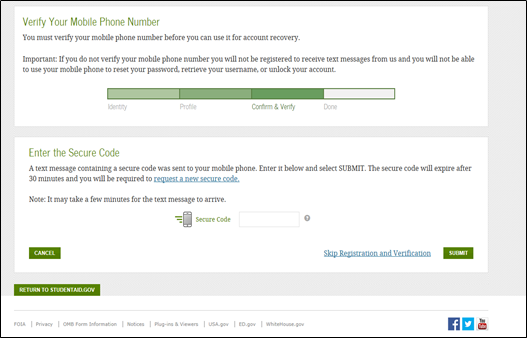
Verify Your Mobile Phone Number
If you provided a mobile phone number, then you’ll be taken to the Mobile Phone Number Verification page.
Once you verify your mobile phone number, you can use your mobile phone to unlock your account, retrieve your username, or reset your password.
You can also continue without verifying.
How to Verify Your Mobile Phone Number
Do not close the Mobile Phone Number Verification page.
You’ll receive a text message with a secure code.
The text message will include a six-digit numeric code that you will enter in the “Secure Code” data field.
Mobile Phone Number Verification Page
Verify Your Email
If you provided an email address, then you’ll be taken to the Email Verification page.
Once you verify your email, you can use your email address as your username when logging in to Department of Education websites.
How to Verify Your Email
Do not close the Email Verification page.
You’ll receive an email with a secure code.
Log in to your email account using a different tab or browser window or another device.
Look for an email with the subject line, “Important: Your FSA ID E-mail Validation – Action Required.”
The email will include a six-digit numeric code that you will enter in the “Secure Code” data field.
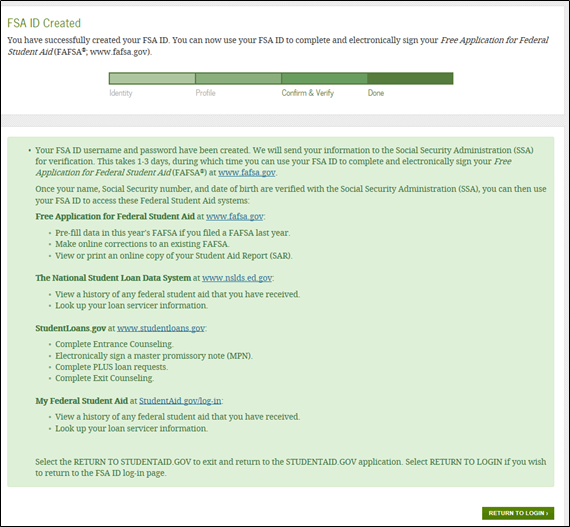
Your FSA ID is created!
Your FSA ID was created.
If you provided an email address, then you’ll receive a confirmation email.
Using Your FSA ID
You can log in to fafsa.gov and complete, sign, and submit a new (original) FAFSA® form.
Your info will be sent to the Social Security Administration (SSA) for confirmation.
SSA review will take 1–3 days.
Until your info is verified, you won’t be able to take certain actions, such as correcting your FAFSAform, submitting a renewal FAFSAform, or signing a Master Promissory Note.
FSA ID Tips
One of your parents might need an FSA ID as well. If you need to provide information about your parents on the FAFSA® form, one of your parents will have to sign the form. Your parent can create an FSA ID and then sign the FAFSA form electronically using that FSA ID. Not sure whether you’ll need to put your parents’ information on the FAFSA form? Check out StudentAid.gov/dependency. Remember: You should create your own FSA ID and your parent should create his or her own FSA ID. Also, make sure to use the correct FSA ID when signing the FAFSA form electronically.
When you first create your FSA ID, all you’ll be able to use your FSA ID for is to complete, sign, and submit an original (first-time) FAFSA form. You’ll have to wait one to three days for your information to be confirmed by the Social Security Administration (SSA) before you can use your FSA ID for other actions, such as submitting a Renewal FAFSA form or signing a Master Promissory Note. If you provided an email address, then you’ll receive an email letting you know that your information was successfully matched with the SSA and you can use your FSA ID for all of its purposes.
If you forget your FSA ID username and password, look for links, such as “Forgot My Username” and “Forgot My Password,” at the log-in pages of our websites. These links will direct you to web pages where you can request a secure code to be texted to your verified mobile phone number or emailed to your verified email address. The secure code will allow you to retrieve your username or reset your password. You can also retrieve your username or reset your password by successfully answering your challenge questions.
What’s an FSA ID? The FSA ID is a username and password you use to log in to certain U.S. Department of Education websites, including fafsa.gov, StudentAid.gov, and StudentLoans.gov. The FSA ID is your legal signature and shouldn’t be created or used by anyone other than you—not even your parent, your child, a school official, or a loan company representative. You’ll use your FSA ID every year you fill out a Free Application for Federal Student Aid (FAFSA® ) form and for the lifetime of your federal student loans. How do I get an FSA ID? Visit StudentAid.gov/fsaid to create an FSA ID. You’ll need your Social Security number, full name, and date of birth. You’ll also need to create a memorable username and password, and provide answers to some challenge questions so you can retrieve your account information if you forget it. We strongly recommend that you provide a mobile phone number and email address when you make your FSA ID. Providing a mobile phone number and/or email address that you have access to will make it easier to unlock your account, retrieve your forgotten username, or reset your forgotten password. Important: An email address and mobile phone number cannot be used with more than one FSA ID. If you share an email address with someone else, then only one of you will be able to use that email address to create an FSA ID. This applies to your mobile phone number too.
Filling out the FAFSA® form is the first step to getting financial aid. It is the application required by all schools in awarding federal student aid to those who qualify. The FAFSA form helps you get access to get:
● Federal grants ● Federal student loans ● Federal work-study ● State loans ● State grants and scholarships ● Grants and scholarships from other organizations
To make it easier, there are two ways designed to help you complete your FAFSA form:
1. Download the myStudentAid app (available on iOS and Android) and conveniently fill it out on a mobile device
2. Or visit fafsa.gov to complete the FAFSA form on your mobile device or laptop